How to Create an Effective Website Design Documentation
Your website is your major assisting tool in reaching your business goals. It is essentially the most important representation of your business so, regardless of the website complexity, it is crucial that it works properly.
If you are not a developer, you are going to delegate the website development task to the internal or external team. Naturally, you will need a tool to help you monitor the process and evaluate the results. In other words, you will need a set of specific rules and metrics to ensure that the web development team deliver the desired results.
This set of rules and metrics is presented as Website Design Documentation.
Why do you need a website design documentation?
Website documentation is a must as it provides easily accessible information on a product and gives answers to important questions pertaining to:
- product usage in general
- aspects of functionality
- architecture of a technical product.
The benefits of website design documentation include:
Easy-to-enable control
Well-created website design documents help you track the project progress at all stages and will let you prevent or notice any coming pitfalls.
Time saving
If something goes wrong and you would like to change the team, you can do it with minimal waste of time. With the available documentation, the new team can easily understand the current status of the project and dive into work without delay.
Tool for evaluation
The performance metrics and quality/functionality requirements will help you easily evaluate the quality and completeness of the job done.
What do you need to create an effective website design documentation?
Every website is a result of some idea and time/resources investment in this idea. So, the process of website creation highly depends on these factors. To get the best results, you will need some specific type of website design documentation that fits the process.
There are 2 common website development approaches:
Fixed Scope/Price
You have a full/complete/comprehensive concept and picture of structure, functionalities and interfaces of your future website and some distinct budget for its implementation. All you need is the team that can guarantee to deliver results you require within the budget you set for the project.
Time and Materials
You have the overall idea of the website as a product but there is no complete picture of its structure, functionalities and interfaces. Plenty of new ideas and requirements will be added to the website concept. In this case, you need the implementation process to be quick and smooth.
There are certain characteristics that define each type of website design documentation development approach.
Website Design Documentation for the Fixed Scope/Price development approach
The effective website documentation within Fixed Scope approach is created by:
Defining Core Functionalities
At this stage, key participants are Business Owner (BO) and Business Analyst (BA).
BO needs to formulate core functionalities of the website. To formulate core functionalities correctly, BO answers the following questions:
- Who is going to benefit from using the website?
- What benefits or valuethe website users get?
Below, there is Web Browser Market Share page of Statcounter website that can be an illustrative example for understanding this point in detail.
Who: web developers, marketing specialists, ecommerce websites owners;
What: information about web browsers popularity.
Outlining Wireframes
Once the core functionalities are defined, user experience (UX) and user interface (UI) specialists join the process for accomplishing the next stage of outlining wireframes.
Wireframes are interfaces for the core functionalities delivery. For example, to deliver the websites popularity info, there should be an interface with such components as:
- A space for a chart
- Buttons or links to download/share the data
- Quick snapshot with figures for top 5-6 websites
- Option to filter chart by different device types and purposes, periods of time, regions
- Option to change the chart type
Business Analyst helps specify the functionalities for different wireframes for different user roles.
UX and UI Specialists help divide those functionalities by wireframes and create mockups of those wireframes.
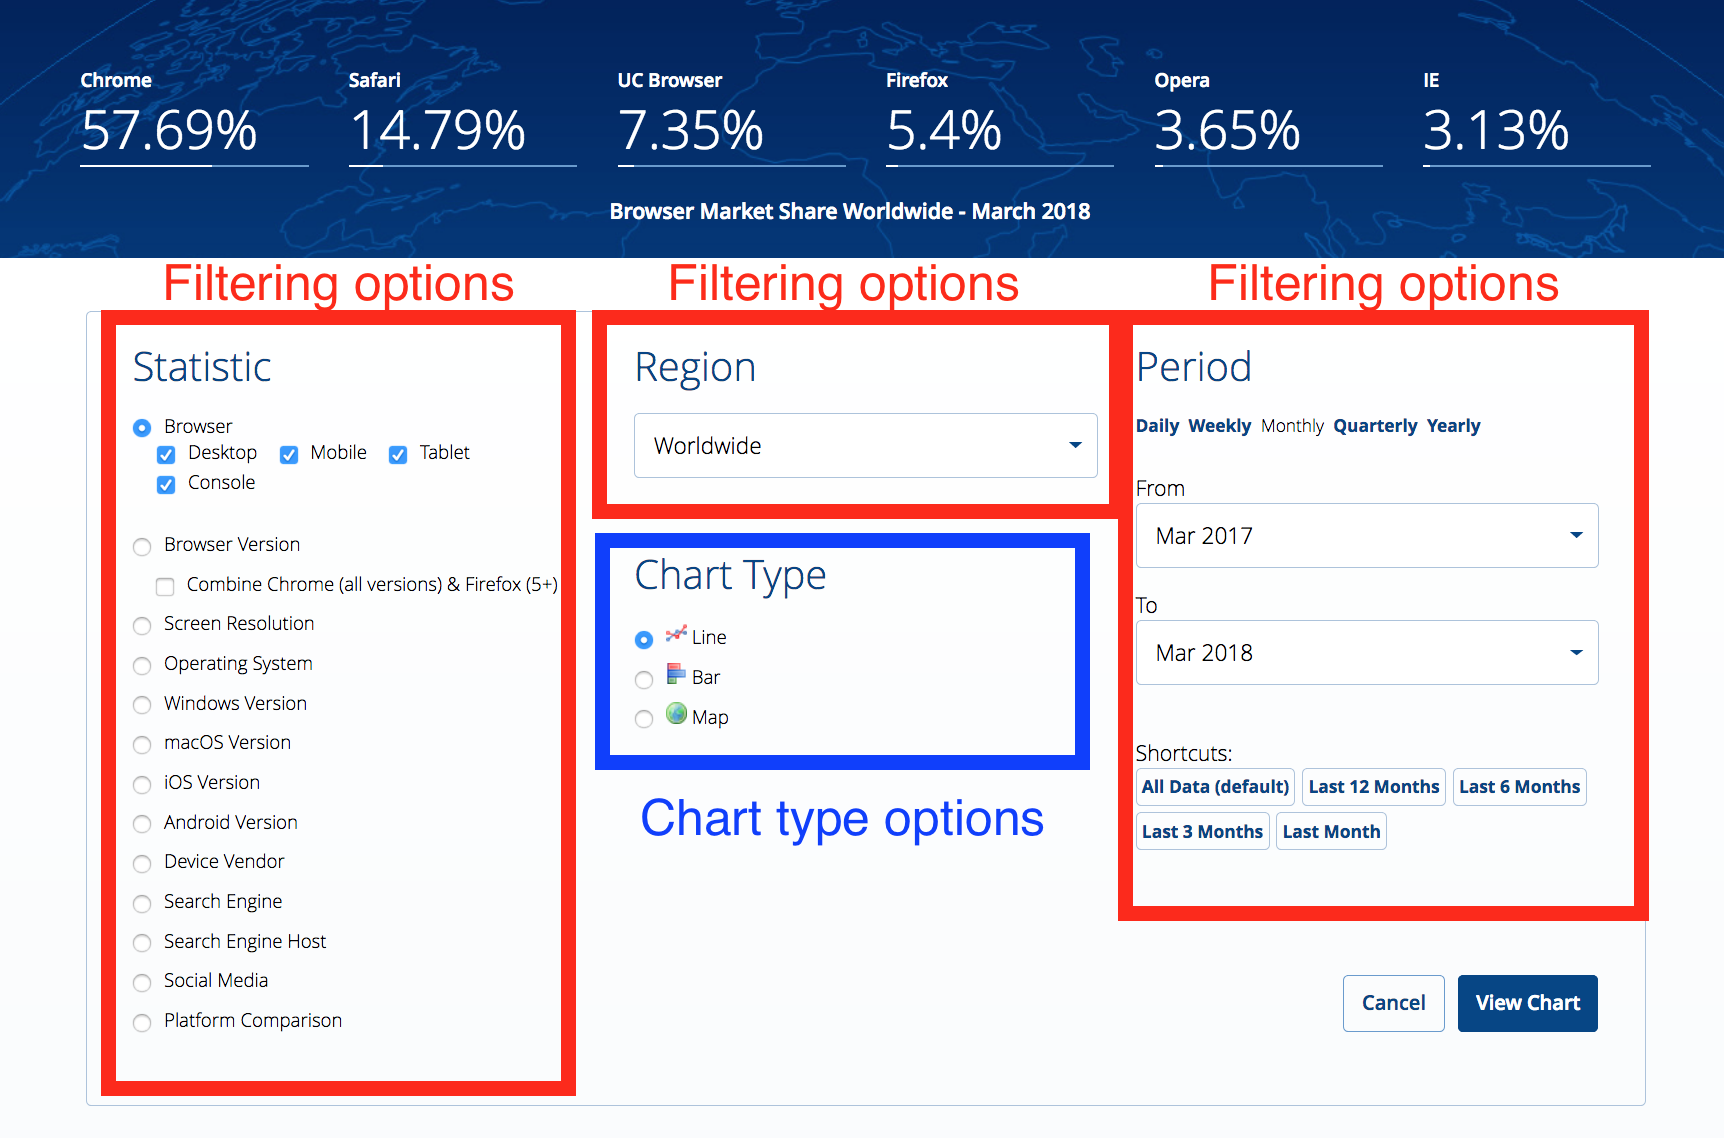
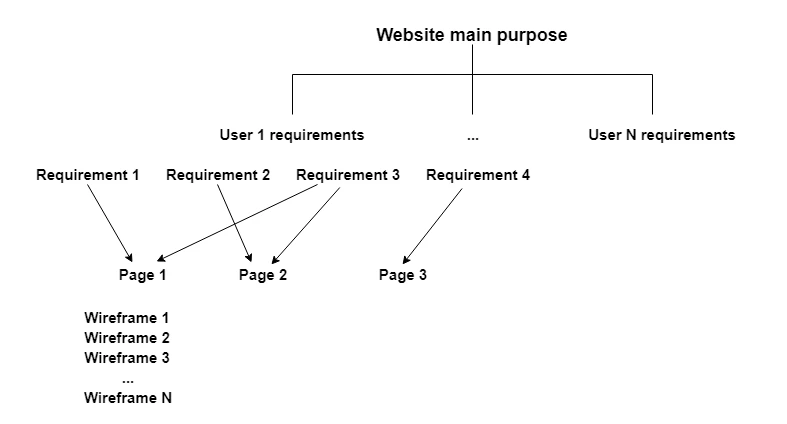
Important: Each wireframe needs placement on some web page. Basically, collection of wireframes placed on some number of web pages is your website structure.
Wireframes placement is UX/UI specialists’ competence.
Wireframing tools that are widely used are Microsoft Visio, Axure, Balsamiq, Wireframe.cc.
As a result, you are going to complete the ‘top level’ of your website design requirements:
Finalising wireframes to the website tech specs
After wireframes are created, the next step is to describe how each element of the wireframe works and looks like. Let’s use the element from our example as a reference.
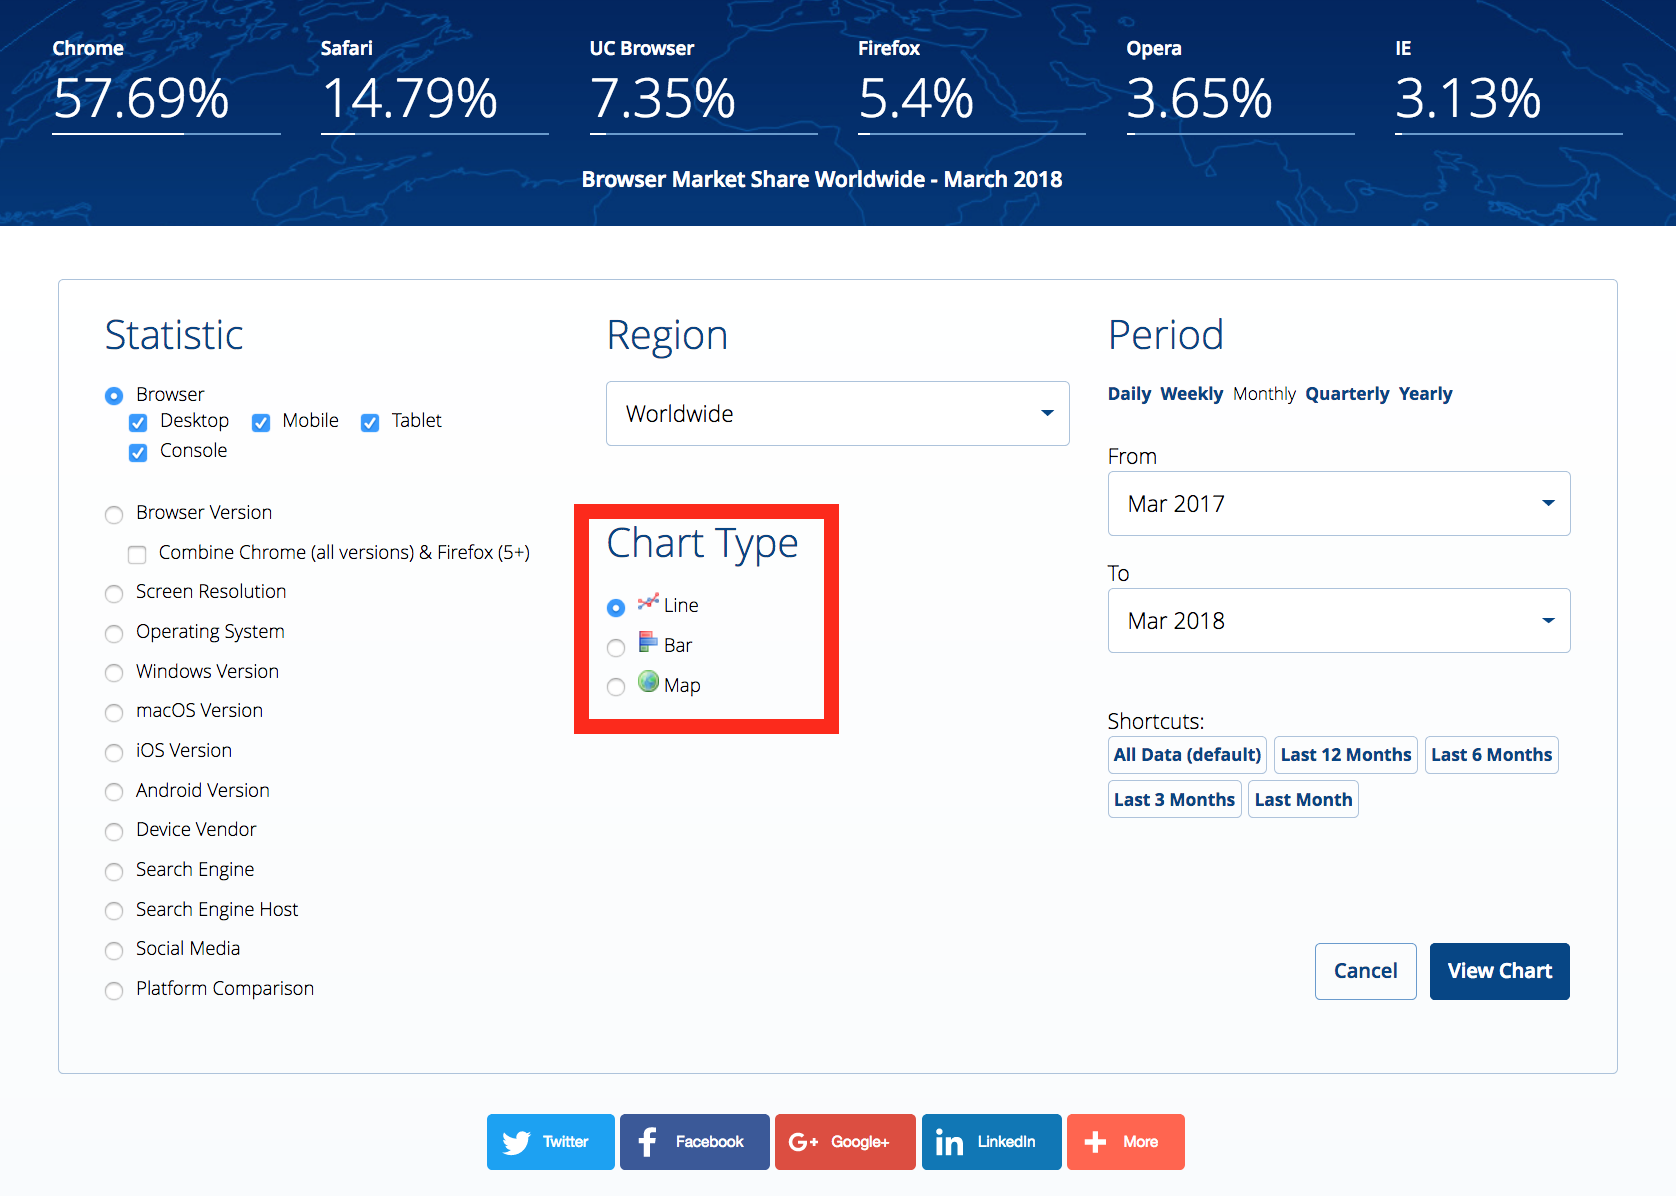
- Name of the element [Chart Type Selector]
- Type of the element [Radio Buttons]
✔Hint: You can use web design dictionary to properly name the elements. UI Specialist is the guide here. - What is the function of the element [Helps user choose the chart type]
- Where it is situated on the web page [Absolute or Relative metrics can be used]
- Its size, dimensions, colors, shades… [UI Specialist’s and Designer’s task]
- Its changing elements and its initial condition [The first radio button in the list is selected]
- How it reacts visually on interactions with it (hovers, clicks…) [No interactions]
- What interaction should be done to deliver its function [Single click/tap on radio button/radio button name/radio button icon]
- How element indicates that its function is delivered [radio button is selected]
✔Hint: UX and UI Specialists help to define how each element interacts with a user - How changes of the element affect other elements of the page/website? [When settings applied the chart type on the ‘Results’ page changes according to the radio button]
As a result, you are going to complete your website documentation structure:
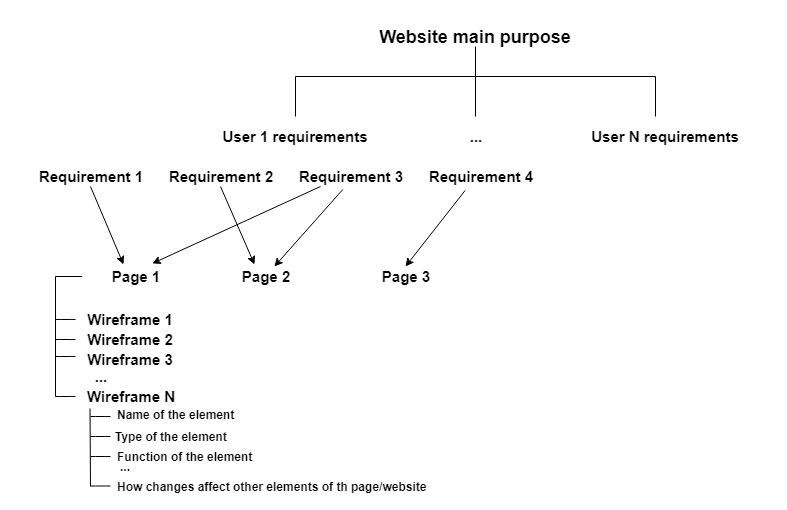
In other words, you have a collection of specs for the wireframes that:
- belong to some page(s)
- that are created for some user(s)
- that use them to meet their requirements
- to deliver website main purpose
Finalizing website design documentation (for fixed scope)
Now that you have the website design documentation structure, you can collect all the information in one document using the same structure as illustrated on the infographic above.
Note that at this stage you can add specific requirements regarding usage of some particular technologies, libraries etc., and Business Analyst is the person that assists you at this stage.
Important: any changes regarding the website functionalities after the documentation creation require its update (new user/page/wireframe specs)
Website Design Documentation for the Time & Material development approach
This approach works with the Agile methodology that does not imply any well-defined documentation. The project is divided into parts so you can be involved in the development process, follow every step of the project and make changes to any specific part without harming the project in general.
Key Participants
In this approach, we start with creating a user story. A user story is an informal, natural language description of one or more features of a software system written from the perspective of an end user.
Key participants of this stage are BA, Project Manager (PM), Back-end developers, Front-end developers, designers, QA, and, of course, BO.
User stories are often written on index cards or sticky notes on walls or special online programs to facilitate planning and discussion. When everyone is involved in the process it is easier to divide the work in sprints. One sprint usually takes 1-4 weeks, and within this set period of time a certain functionality is to be delivered.
With work divided into sprints, the team works over functionality so that it does not intersect, and sprints do not overlap.
Main questions asked
At the stage of UX (user experience) design, the team defines the goals, objectives, and strategy for the UX. During this phase we specify website users and their design requirements.
The scope of questions that we address at this stage:
- Who? Use personas (tools that document how users behave) and user scenarios (tools that capture detailed information about prototypical users) to further define users.
- Why? We examine the user needs or tasks that has to be accomplished in the UX and employ user tasks to detail the end-to-end journeys required for the user to accomplish a task. The tasks the user needs to achieve are listed and user journeys are framed around that.
- What? We list devices or channels (desktop, smartphone, tablet, etc.) that the users employ to engage with the UX.
- Where? Predicting where the user is likely to get experience. With the prevalence of mobile technology today, the user’s venue could vary. We make sure to capture and consider various locations, such as home, en route to the store, in the store, and so on.
- When? What time of day is a user likely to engage with the experience? We also consider events and holidays, such as anniversaries involving gift-giving, Valentine’s Day, or any time the user would need to re-engage with the experience.
Creating a story map
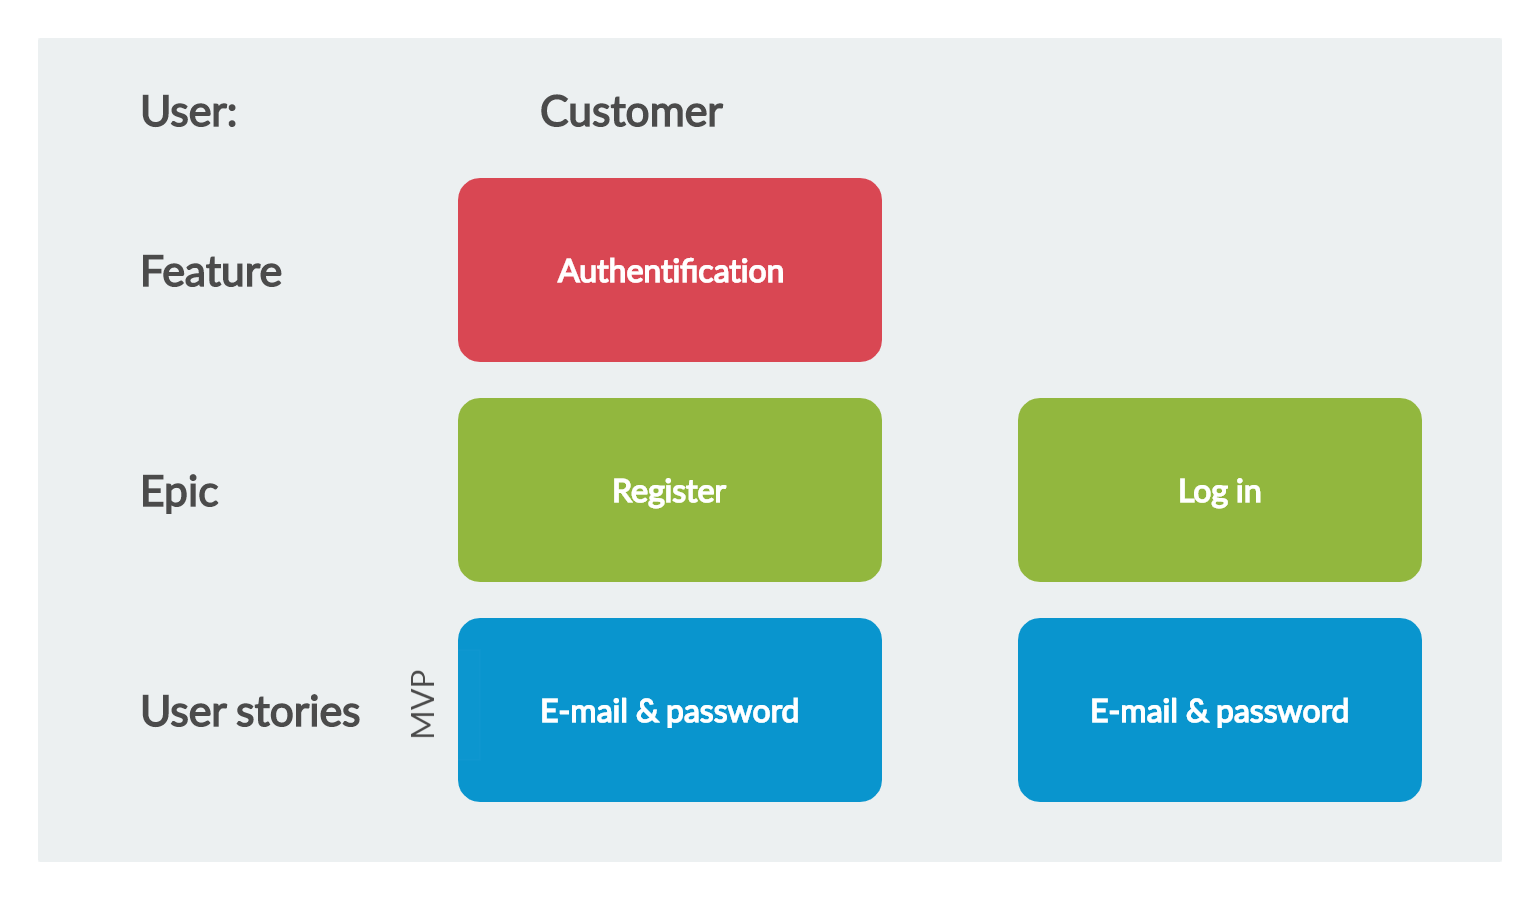
A story map is a technique that takes a user-centric perspective for generating a set of user stories. Let’s explain how the user stories are created with the example. Say you want to create a website where your customers will be able to search for restaurants, place orders or get food delivery, like this one https://new-york.eat24hours.com.
- The very first thing for every user on your website is “Authentication”, and this will be your feature.
- If your customers are the first-timers on your website, they will have to register. If they are returning customers, they log in. This way, your feature gets divided into 2 epics (Registration and Login).
- Our next step is to define how these 2 epics will be implemented from user’s perspective.
For this particular case, the beginning of your story map for this feature looks like this:
The tasks for the sprint to cover this functionality are placed in the backlog. The time to complete the task should not exceed 12 hours. There are 2 types of backlogs:
- Product backlog: The list of all the works to be implemented in order to receive the final product.
- Sprint backlog: The list of works that the team determined and agreed with the Product Owner for the next reporting period (sprint). Assignments to the sprint-backlog are taken from the product-backlog.
In the story map the team and the Product Owner can define what functionality will be in the MVP or the 1st version of the product, what elements will be added in the next versions. By adding and moving elements on the board for our example project we soon received a Story Map.
Finishing the sprint
Each sprint has the following checkpoints:
- Definition of Ready: It enables a team to specify certain pre-conditions that must be fulfilled before a story is allowed into an iteration. The goal is to prevent problems before they arise (source)
- Definition of Done: It is a list of requirements determining the feature completion.
- Acceptance Criteria: They are the conditions under which the final product is accepted by the Product Owner.
At the end of each sprint, the released product is demonstrated by the development team. At this stage, you evaluate if it meets the Acceptance criteria.
The team holds a retrospective meeting to sum up the sprint results, determine the tasks for the next sprint and craft the improvements for next development projects. When you choose Agile approach for your project, you pay per sprint completion (practically speaking, for the functionality developed in that sprint).
Find out more about our
To conclude
The website design documentation is crucial for setting up the website environment. It puts custom software development into context of business needs and specific requirements and provides the information mandatory for optimal maintenance and support of the software.
Website documentation focuses the user’s attention on advantages that software can provide and, thus, by enriching the user’s experience, it facilitates the business process bringing benefits to the Business Owner as well.